Thursday, May 14, 2015

How to Grow Romanesco Cauliflowers

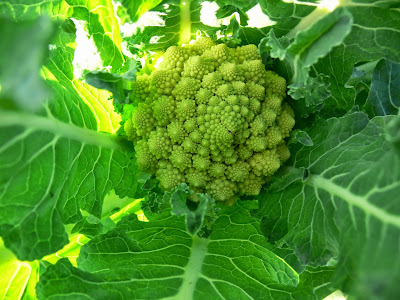
Some vegetables are born showoffs. It may be because they're loud (super-sized pumpkins), blousy (curly kale) or just plain beautiful. The Romanesco cauliflower fits into the latter category and, to the uninitiated, the precision of its intricate, geometric heads, or curds, really does earn it admiration.


The Romanesco is a member of the cabbage family. For the sake of this article and to keep things 'tidy' I've called it a cauliflower. But, the truth is, it's in a class of its own – neither cauliflower nor broccoli but somewhere in-between. Hailing from northern Italy, this approximately 500-year-old brassica has all the hallmarks of Italian design. It's suave. It's sophisticated. And it promises impeccably good taste!

Sow from spring to midsummer to give a succession of curds. Like all brassicas, Romanesco cauliflower is best started off in a fertile seedbed or in modules of seed compost/potting mix. I prefer using generous-sized module trays because this produces really solid plants, while minimising root disturbance at planting out time. Aim for a cell size that's at least 5cm (2in) across. Start your earliest seedlings off under the protection of an unheated greenhouse or cold frame.

Sow the seeds 1cm (0.5in) deep, sowing two to three seeds per cell. They can be thinned out to leave the strongest seedling once they have all germinated. Romanesco cauliflowers planted outsideGiven a little warmth they may pop up in as little as four days, but allow up to two weeks. The seeds need a minimum temperature of 10°C/50°F to germinate but once they're up the daytime temperature can happily hover around 7°C/45°F with no negative impacts on the seedlings.

Young plants that have been started off under cover will need to be hardened off before they are planted out. This will stop them from sulking at the sudden transition from relative warmth to cold. Hardening off Romanesco Cauliflower as a young plantis especially important in temperate regions or in a slow season where spring is late in arriving. To harden plants off, leave them outside during the day and bring them back under cover at night, gradually increasing the length of time plants are out of doors over a period of one to two weeks.

Romanesco cauliflowers need fertile soil – perhaps improved over the winter with plenty of well-rotted manure or compost. A final flurry of bone meal or similar organic fertiliser at planting time will encourage strong root growth.

Plant seedlings out into their final positions once they are 10-15cm (4-6in) tall. The closer the spacing, the smaller the curds, so it's really up to you how far or near you plant. I aim for 60cm (2ft) between plants and 60-90cm (2-3ft) between rows. This might seem like a lot of space, but you can always sow a quick-to-mature catch crop, such as salad leaves or radishes, in-between the rows while the plants are still young and don't need that extra space.

To plant, dig a hole for each plant then ease the root ball from its module, disturbing the roots as little as possible. Harvested Romanesco CauliflowerFirm in really well then 'puddle' the soil around the plant by thoroughly watering the ground to further settle the soil around the roots.
Tuesday, April 21, 2015

Different Type of Limes


The lime is used in cooking around the world. As a citrus fruit, it is related to the lemon, orange, grapefruit, and citron. It is the least sweet of the common citrus fruits, but its aromatic oils and strong, distinctive taste make it a popular flavoring agent. The lime family includes a number of varieties, each with distinctive characteristics and uses.


Citrus latifolia, the Persian or Tahitian lime, is the most common lime in American supermarkets. Fairly large and quite juicy, it is the most adaptable in cooking. While they have a reputation for being tart, Persian limes are less tart than Key limes. They are also easier to grow and have a thicker skin, making them more suitable for packing and transport.

Citrus aurantifolia, the Key or Mexican lime, is a small, round lime with a pale yellowish-green skin. Key limes are more acidic than Persian limes and have a distinctive aroma. The Key lime tree has dense foliage and many very sharp thorns, making them a less popular fruit crop than the Persian variety. Key limes pickled in salt water were a popular treat for children in the 1800s, as readers of Louisa May Alcott's "Little Women" will recall.

Citrus hystrix, the kaffir lime, is unique among limes for its skin, which is pebbly or warty in texture and rich in lime oil. Unlike other limes, the kaffir lime has very little juice. The leaves and zest are used widely in Thai cuisine.

Citrus glauca, the Australian desert lime, is one of the smallest limes, not much larger than a marble. It is a prized "bush food" and is made into many commercial products, including marmalade and glacéed fruit.

Citrus mitis, commonly known as kalamansi, calamondin, or musk lime, is a very tart lime that is widely used in Philippine cuisine. It is another very small lime, about an inch in diameter and orange in color. It has a very thin skin and does not store or transport well. Because the fruit takes nearly a year to fully ripen, the tree is frequently grown as an ornamental, both at full-size and as a bonsai.

The Rangpur or mandarin lime is not a true lime, as it is a hybrid of the lemon and the mandarin orange. However, because its juice is extremely acidic, it is often used as a substitute for true limes in cooking. Popular uses include pickling, candying, and being made into marmalade.

Thursday, March 26, 2015

Tips For Growing Onions

Growing Tips
Choose a site with at least 6 hours of direct sunlight.
Onions can be started 3 ways: by Sets (tiny bulbs), Transplants and Direct Seeding. Though planting onion sets is the most popular way to grow them, you'll have better results transplanting seedlings you start indoors ahead of time.

SETS: Sets are just tiny bulbs that were started from seed the year before. Although they are the easiest way to plant onions, transplants actually offer better success and store better.
Onion sets should be about the size of a marble. Larger sets don’t always adjust well and could bolt or split. For similar reasons, don’t buy sets that have already sprouted. And as with all bulbs, onion sets should be firm and healthy looking.Sets can be planted early in the season, before the last frost, but after the soil has dried and warmed a bit. Plant onion sets pointed end up and cover with about 2" of soil. Depending on the mature size of your variety of onion, space about 3-4" apart.

TRANSPLANTS: Transplants generally result in larger onions than sets. You can buy transplants or start your own indoors from seed. Start onion seed about 8 - 12 weeks before your transplant date. Plant onion seed about 1/4 - ½" deep. You can plant thickly and thin at transplant time. Keep the soil moist. As the tops grow, keep them trimmed to about 4".Transplants or onion seedlings will need to be hardened off before plantingoutdoors. Wait until all danger of frost has passed before planting.

DIRECT SEEDING: Direct seeding onions require a longer season, so warmer climates will have better luck. To direct seed, follow the directions above for seeding transplants.

Pests & Problems:

Rot: In damp soils you may encounter neck or stem rot or bulb rot. Avoid with good soil drainage and air circulation.

Splitting: Bulbs will split or double if the soil is allowed to remain dry while the bulbs are forming.

Thrips: Small yellowish-brown flying insects that feed on leaves and can cause twisting and curling. Repeated attacks cause the plant to stop growing, so bulbs don’t mature. Plant resistant varieties. Don’t plant near grain crops. Neem and insecticidal soaps provide temporary control.

Onion Root Maggots: Eggs are laid near the base of onion plants. The larvae hatch and burrow into the stems, feeding on the plants below the soil and eventually killing the plants. Rotate plants yearly to avoid infestation. Covering new seedlings will prevent eggs being laid. Diatomaceous earth is also effective.

More Onion Growing Tips:

1. Growing Larger Onions: Onion bulb size is related to the size and number of the leaves. Each leaf translates to a ring of onion. Larger leaves make larger rings. So choosing the right type of onion for your day length will give your onion tops time to form before the onion bulb begins developing: more leaves, more bulb.

2. Water stressed onions are stronger in flavor and more pungent.

3. Onion seed doesn’t store well, so only buy what you plan to use the current year.

Thursday, March 5, 2015

Tomato 'Black Cherry'


“Black Cherry” is a lovely jewel of a tomato, still fairly rare, they are the only truly black cherry tomato available. Perfectly round with the classic black tomato flavour, sweet yet rich and complex.
The plant produces huge clusters of 2.5cm (1in) round, deep purple, mahogany-brown cherry tomatoes on vigorous, tall plants. The fruit picks clean from the stem. Easy to grow and disease resistant, they can be grown in the greenhouse or outdoors in a sunny spot.


Timing: 
As they cannot tolerate any degree of frost the timing for sowing and planting outside is key to successfully growing tomatoes. Where the seeds are sown under cover or indoors, aim to sow the seeds so that they reach the stage to be transplanted outside three weeks after the last frost date. Tomato plants take roughly seven weeks from sowing to reach the transplanting stage. For example, if your last frost date is early May, the seeds should be planted in early April to allow transplanting at the end of May.

Position: 
Tomatoes require a full sun position. Two or three weeks before planting, dig the soil over and incorporate as much organic matter as possible.
The best soil used for containers is half potting compost and half a soil-based type loam: this gives some weight to the soil.

Sowing:
Plant about 3mm (1/8in) deep, in small pots using seed starting compost. Water lightly and keep consistently moist until germination occurs. Tomato seeds usually germinate within 5 to 10 days when kept in the optimum temperature range of 21 to 27°C (70 to 80°F). As soon as they emerge, place them in a location that receives a lot of light and a cooler temperature (60 to 70°F); a south-facing window should work.

Transplanting:
When the plants develop their first true leaves, and before they become root bound, they should be transplanted into larger into 20cm (4in) pots. Young plants are very tender and susceptible to frost damage, as well as sunburn. I protect my young plants by placing a large plastic milk jug, with the bottom removed, to form a miniature greenhouse.
Depending on the components of your compost, you may need to begin fertilising. If you do fertilise, do it very, very sparingly with a weak dilution. Transplant into their final positions when they are about 15cm (6in) high. Two to three weeks prior to this, the plants should be hardened off.

Planting: 
Just before transplanting the tomato plants to their final position drive a strong stake into the ground 5cm (2in) from the planting position. The stake should be at least 30cm (1ft) deep in the ground and 1.2m (4ft) above ground level - the further into the ground the better the support. As the plant grows, tie in the main stem to the support stake - check previous ties to ensure that they do not cut into the stem as the plant grows. Dig a hole 45cm (18in) apart in the bed to the same depth as the pot and water if conditions are at all dry. Ease the plant out of the pot, keeping the root ball as undisturbed as far as possible. Place it in the hole and fill around the plant with soil. The soil should be a little higher than it was in the pot. Loosely tie the plant's stem to the support stake using soft garden twine –allow some slack for future growth.

Cultivation: 
A constant supply of moisture is essential, dry periods significantly increase the risk of the fruit splitting. Feed with a liquid tomato fertiliser (high in potash) starting when the first fruits start to form, and every two or three weeks up to the end of August. In September, feed with a general fertiliser (higher in nitrogen) in order to help the plant support it's foliage. Over watering may help to produce larger fruit, but flavour may be reduced. Additionally, splitting and cracking can result from uneven and excessive watering.

Pruning:
When the first fruits begin to form, pinch out the side shoots between the main stem. Also remove lower leaves which show any signs of yellowing to avoid infection.

Harvesting:
Pick as soon as the fruits are ripe, this also encourages the production of more fruit. Harvest all the fruit as soon as frost threatens and ripen on a window sill.


Black Tomatoes: 
Black Tomatoes are native to the Southern Ukraine and their seeds were later distributed throughout Western Russia after the Crimean War by soldiers returning home from the front during the early 19th century.
Though black tomatoes originally existed in only a relatively small area on the Crimean Peninsula and were limited to only a handful of recognisable varieties, in the years to follow, new varieties of all shapes and sizes began to appear throughout the Imperial Russian Empire.
Today there are at least fifty varieties of black tomato found in the territories of the former Soviet Union, as well as nearly a dozen other types of new black tomatoes which have cropped up elsewhere, most notably in Germany, the former Yugoslavia and the United States.
Besides their extremely dark colours, black tomatoes are especially noted for their exceptionally rich, earthy tastes. Among all colours, black tomatoes are blessed with the strongest taste and are typically the most admired among true tomato aficionados.

Wednesday, February 11, 2015

Types of Feeders for Beekeeping

Learn about the different types of feeders for your Langstroth beehive, the most common hive style, and when and how to use each of them.

 Inverted Pail Feeder
An inverted pail feeder is just that: a plastic pail, usually one gallon in size, that has a small opening in the middle with a friction-fit plug with holes and a screen in it, through which the bees drink the syrup.

Once full of syrup, the pail is inverted over the inner cover hole. Just like a water cooler, the liquid is held in with vacuum pressure, but when the bees drink it, it flows easily.

This setup requires an extra hive body, which is placed around the inverted pail. The outer cover is placed on top of the hive body.

Pros:
Fairly high capacity - although must be filled at least weekly
Easy to handle
Can refill without disturbing the colony much
Inexpensive and DIY-friendly

Cons:
With very cold nights and warm days, can "pump" syrup onto the bees
Limited access to syrup means only a few bees can feed at one time
Requires an extra deep hive body placed around it


Miller or Hivetop Feeder
This type of feeder, as you might guess, sits on top of the Langstroth beehive, with the outer cover providing protection from robbing. It can hold one to three gallons of syrup. Bees enter the feeder from below via a screened access hole.

Pros:
High capacity
Can refill without removing the feeder
Can refill without disturbing the colony

Cons:
Some drowning
Heavy and awkward to move when full

Frame or Division Board Feeder
A frame feeder is a plastic container that is shaped like a wooden hive frame. It replaces two frames along the wall and can be filled with a pint or two of sugar syrup. Ribbed pieces of plastic are often inserted like ladders into the syrup so that bees can climb out.

I personally tried two division board feeders in my hives and found them full of dead, drowned bees in a week. I ended up removing them and went back to a pail feeder.

Pros:
Inexpensive
Can refill without removing the feeder

Cons:
Often heavy drowning of bees occurs
You only have eight frames in the hive body with this feeder
Must smoke and open colony to refill


Boardman or Entrance Feeder
A Boardman or entrance feeder is often provided in "starter" hive kits. It consists of a small, inverted jar of syrup that sits in a wooden device in at the hive entrance. The bees access the feed from just inside the hive entrance. Vacuum pressure delivers just a bit of syrup at a time.

Pros:
Inexpensive and often included in kits
Can refill without disturbing the colony

Cons:
Relatively small capacity
Encourages robbing because of smell and sight of syrup outside the hive
Syrup spoils quickly in the hot sun
In spring bees are not clustered at entrance so can be ineffective for feeding
Risk stinging by guard bees when refilling


Baggie Feeder
One-gallon zip-close plastic bags can be laid on top of frames. Pour roughly three quarts of syrup into a one-gallon bag, zip it up and lay it on the top bars. Use a razor blade to cut several slits in the air bubble in the top of the bag. Squeeze the bag slightly to allow a little syrup to ooze. Cover the baggie feeder with an empty super and an outer cover.

Pros:
Very inexpensive
Puts feed in easy access spot
No drowning

Cons:
Must disturb bees to refeed
Relatively small capacity
Bags are disposable; can't reuse

Wednesday, January 21, 2015

5 Easy Animals to Raise on the Small Farm


Wondering where to start with raising animals on your small farm, hobby farm or homestead? Here are some easy animals to start with, complete with all the information you'll need to learn about and decide which ones are the perfect fit for you.


Chickens are a terrific way to start raising animals on a small farm. They're hardy, easy to take care of, and don't cost much in terms of setup. A small flock can easily produce enough eggs to meet all a family's egg requirements, and a flock of a few dozen can generate a nice little egg business.

Plus, hens eat food scraps and provide great compost for the garden. On the downside, they're a free chicken dinner for every predator out there, so you'll need to keep them safe and secure to prevent losses.


Honey bees are another great choice, especially if keeping bees appeals to you. Honey crops can be abundant, and you can also harvest beeswax for lip balm, candles and other products.

Bonus: they help pollinate your crops. Negative: they cost a good bit to start up, and while they don't require a lot of hands-on care in terms of sheer hours, they do require timely care and attention, and take a while to get the hang of.


Goats are hardy, useful animals who can browse stands of small trees and shrubs, clearing land for you. They're very adaptable to poor pastures. They produce a ton of milk-okay, not a ton, but one to three quarts per day! If your family can't drink that much, you can make and sell cheese, or feed the milk to other farm animals.

On the downside, goats require strong fencing.


Like chickens, turkeys are pretty easy keeping. They can be a bit difficult to raise from poults, but once established, they do well. The market for Thanksgiving turkeys can be a big one, making them a great value-added product for a small farmer.


Pigs are also great browsers and famous rototillers. They can churn up whatever area you want, quite easily. They are also great eaters of food scraps and producers of manure.

Pigs can be vicious, so you'll want to think long and hard before getting them, especially if you have small children, and just plan to be safe around them.